
The Detail Library
Everyday details that actually work in Seattle rain — built, photographed, and priced individually. Passive House, mass timber, and retrofit categories are joining the library over time.
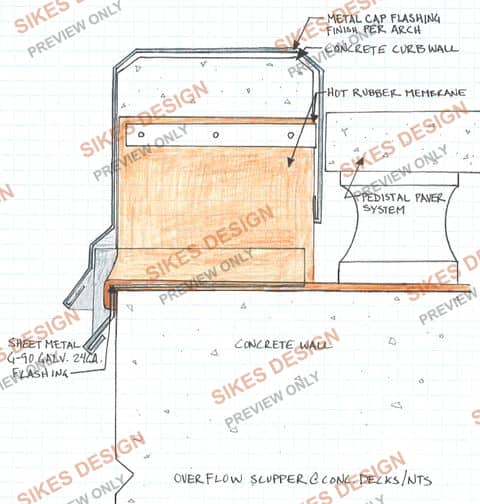
Overflow Scupper at Concrete Decks
Overflow scupper through a concrete curb wall on a paver deck: metal cap flashing, hot rubber waterproofing membrane carried into the scupper, and a pedestal paver system on the field side.
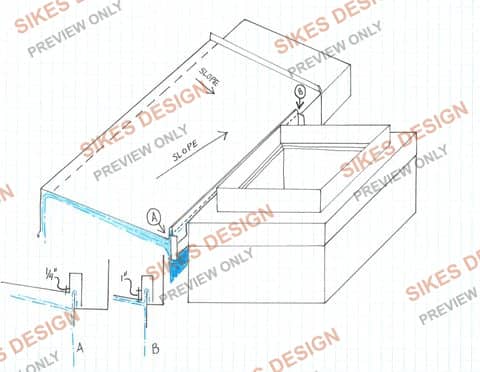
Coping / Roof Edge Scupper Detail
Roof edge coping and scupper condition shown two ways: an isometric of the coping cap with slope direction called out at a parapet corner, and two section options (1/4-inch and 1-inch openings) for the scupper leader itself.
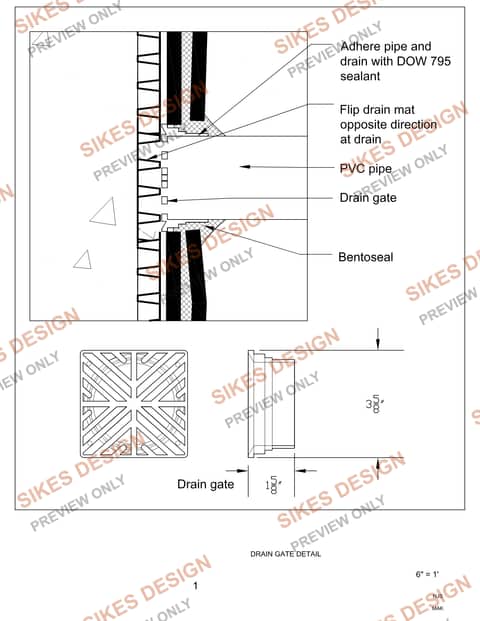
Drain Gate Detail
Drain gate assembly set into a PVC pipe within a waterproofed wall or planter cavity: the pipe and drain adhered with sealant, drain mat flipped in the opposite direction at the drain, and a bentonite-based sealant at the surrounding waterproofing.
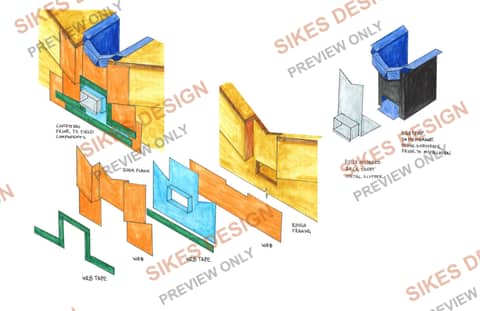
Hidden Cavity Scupper Detail
Hidden-cavity scupper sequence: rough framing and WRB prior to installing field components, quickflash and WRB tape integrating the framed opening, and a fully soldered 24-gauge sheet metal scupper primed with a high-temp SA membrane before installation.
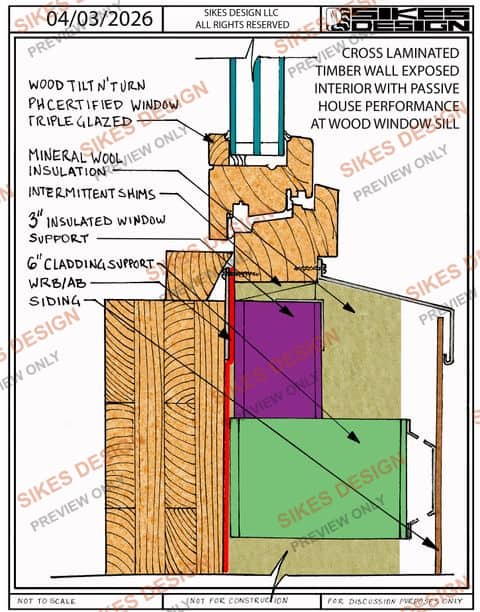
CLT Wall Window Sill — Passive House Performance
Window sill at an exposed cross-laminated-timber wall built to Passive House performance: a PH-certified, triple-glazed wood tilt-and-turn window on a 3-inch insulated window support, mineral wool insulation, intermittent shims, a 6-inch cladding support, and WRB/AB behind the siding. Sikes Design LLC, 2026.
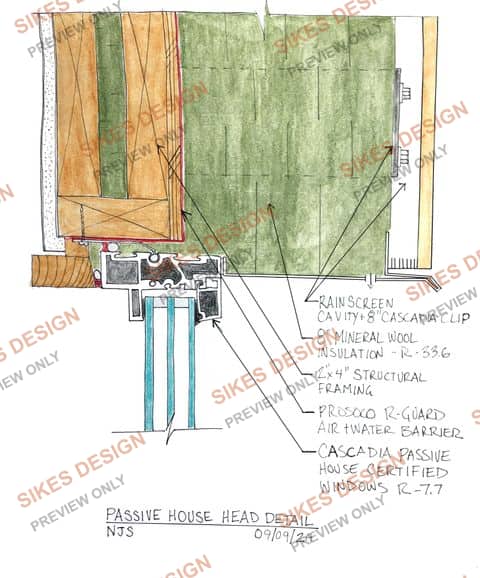
Passive House Window Head Detail
Head condition for a Passive House-level window assembly: Cascadia fiberglass window (R-7.7), 8" mineral wool continuous insulation (R-33.6) over 2x4 structural framing, Prosoco R-Guard air and water barrier, and a rainscreen cavity on 8" Cascadia clips.
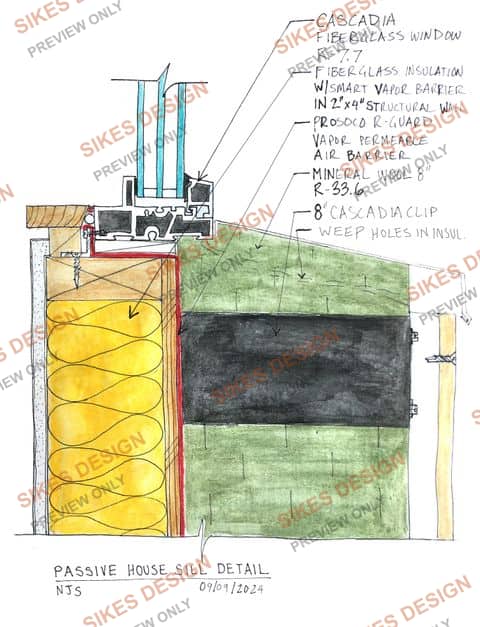
Passive House Window Sill Detail
Sill condition for the same Passive House assembly, with fiberglass insulation and a smart vapor barrier at the structural wall, weep holes through the mineral wool, and the liquid-applied air/water barrier carried under the window flange.
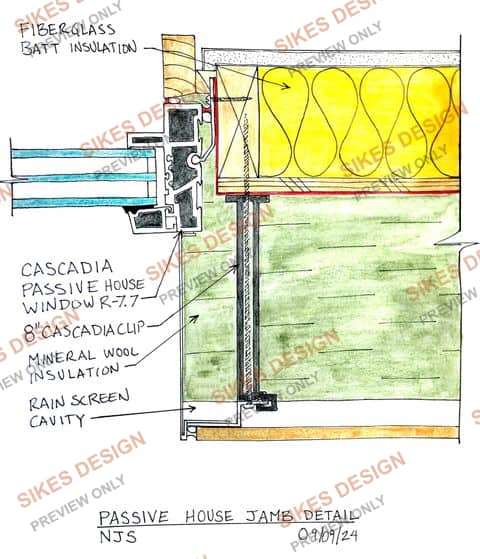
Passive House Window Jamb Detail
Jamb condition for the same Passive House assembly: fiberglass batt insulation at the rough opening, mineral wool continuous insulation, and a rainscreen cavity on 8" Cascadia clips.
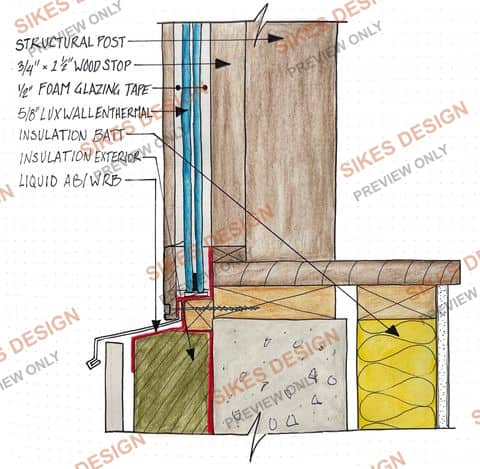
VIG Structural-Post Glazing — Sill Detail
Sill condition for a structural-post glazing system using vacuum insulated glazing (V.I.G.): structural post, wood stops, glazing tape, insulation batt, WRB/air barrier, and a wood cap closing out the sill.
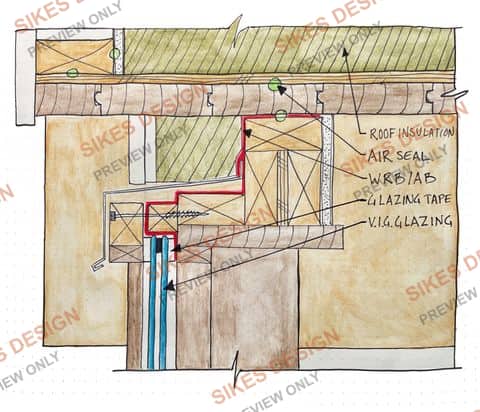
VIG Structural-Post Glazing — Head Detail
Head condition for the same vacuum-insulated-glazing structural-post system, tying the roof insulation and air seal into the WRB/air barrier and glazing tape at the V.I.G. unit.
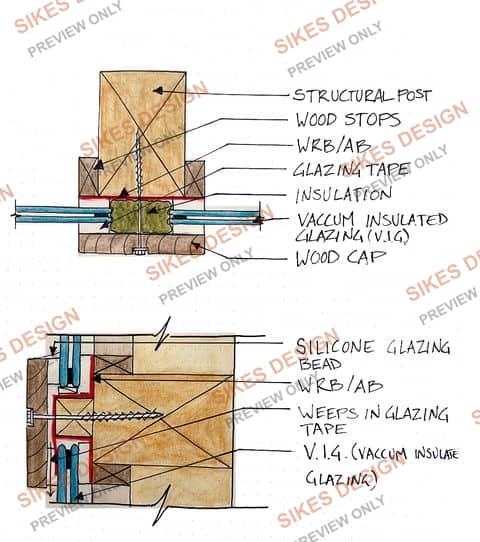
VIG Structural-Post Glazing — Mullion Sections
Mullion sections for the vacuum-insulated-glazing system: structural post, wood stops, WRB/air barrier, glazing tape, insulation, and a silicone glazing bead with weeps built into the glazing tape.
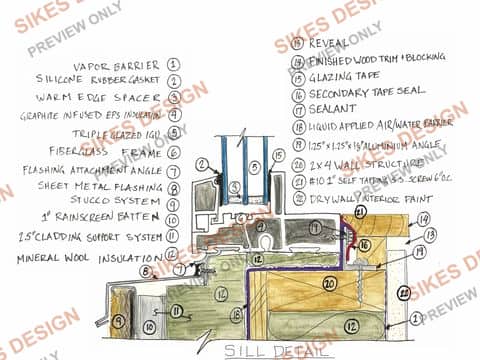
Window Sill Detail — 2x4 Wall, Triple-Glazed Fiberglass
Comprehensive window sill detail at a 2x4 wall: triple-glazed IGU in a fiberglass frame with a warm-edge spacer and silicone rubber gasket, graphite-infused EPS and mineral wool insulation, a liquid-applied air/water barrier, sheet metal flashing over a stucco rainscreen system, and glazing tape with a secondary tape seal -- a fully itemized 22-point assembly.
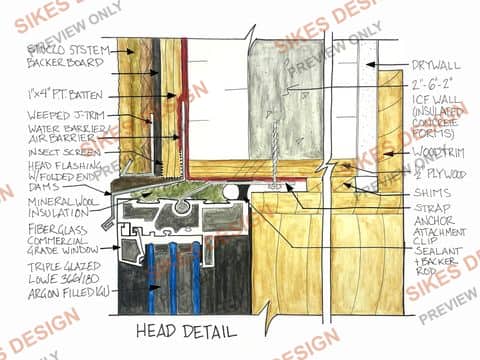
Window Head Detail — Fiberglass Window at Stucco/ICF Wall
Head condition for a fiberglass commercial-grade window with a triple-glazed, LowE-coated, argon-filled IGU set into a 2-6-2 ICF wall: stucco system over backer board and a weeped J-trim, a continuous water/air barrier, mineral wool insulation, head flashing with folded end dams, and a strap-anchor attachment clip tying the window frame to the ICF.
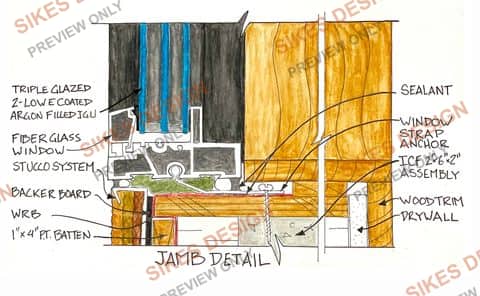
Window Jamb Detail — Fiberglass Window at Stucco/ICF Wall
Jamb condition for the same fiberglass triple-glazed window at a 2-6-2 ICF wall: stucco system over backer board, WRB, PT battens, and a window strap anchor into the ICF assembly, with wood trim and drywall finishing the interior.
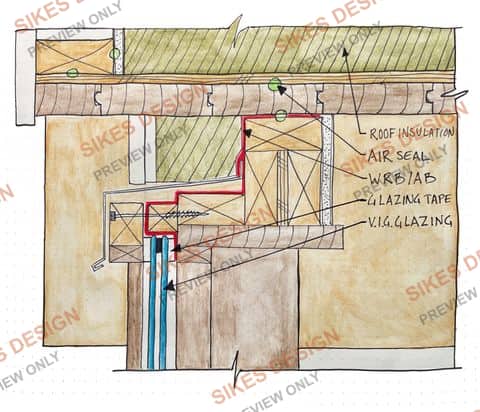
VIG Glazing at Roof Beam Condition
Roof-to-glazing transition at a structural beam using vacuum insulated glazing (V.I.G.): roof insulation, an air seal, WRB/AB, and glazing tape carrying continuity from the roof plane down into the V.I.G. unit.
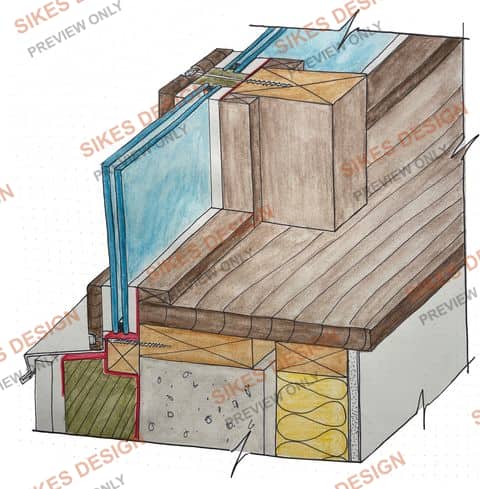
VIG Structural-Post Glazing — Isometric at Concrete Base
Isometric view of the vacuum-insulated-glazing structural-post system at its base: structural post and mullions, mineral wool and batt insulation, a concrete curb, and the liquid AB/WRB carried down to the foundation.
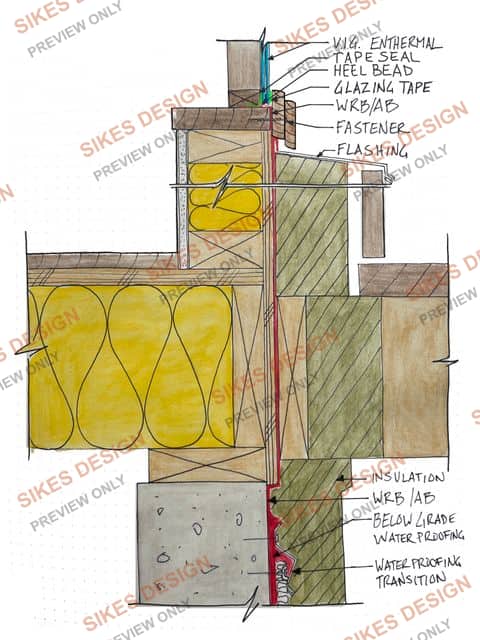
VIG Glazing — Full Wall Section, Roof to Below-Grade
Full wall section for the vacuum-insulated-glazing system showing continuity from the roof (V.I.G. thermal unit, tape seal, heel bead, glazing tape, WRB/AB, flashing) down through the wall insulation to below-grade waterproofing and its transition detail at the foundation.
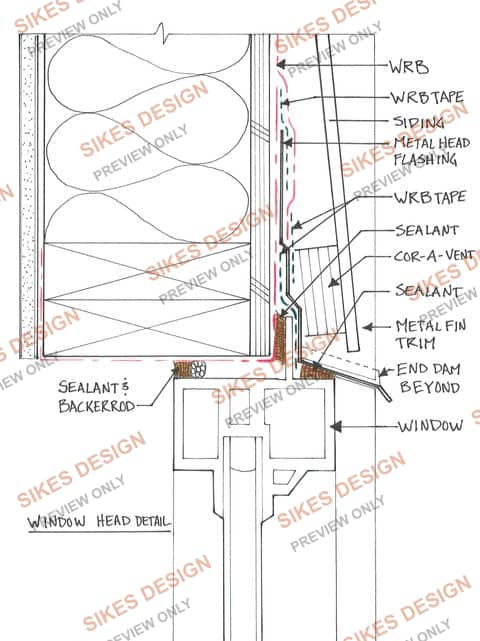
Window Head Detail at Metal Siding
Head flashing at a metal-sided wood-framed wall: WRB and WRB tape, metal head flashing with sealant and backer rod, a Cor-A-Vent drainage path behind the trim, and a metal fin trim with an end dam to keep water out of the joint.
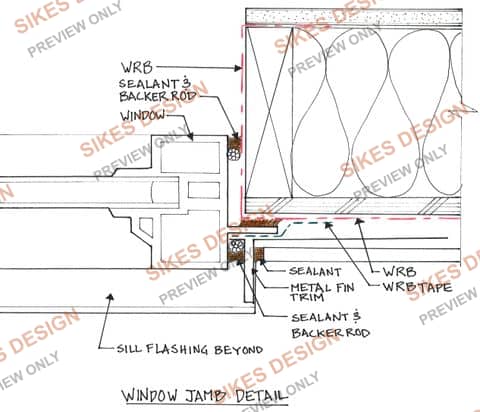
Window Jamb Detail at Metal Siding
Jamb condition for the same metal-siding assembly: WRB, WRB tape, metal fin trim, sealant and backer rod at the window frame, tying into the sill flashing below.
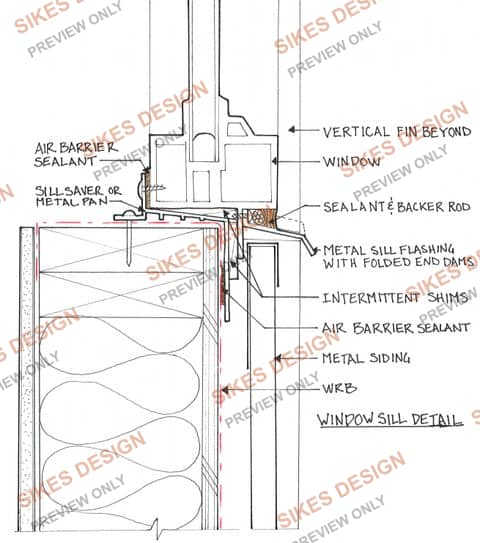
Window Sill Detail at Metal Siding
Sill flashing for the same assembly: a sill saver/metal pan with folded end dams, intermittent shims to keep the pan draining, and air barrier sealant integrated with the WRB behind the metal siding.
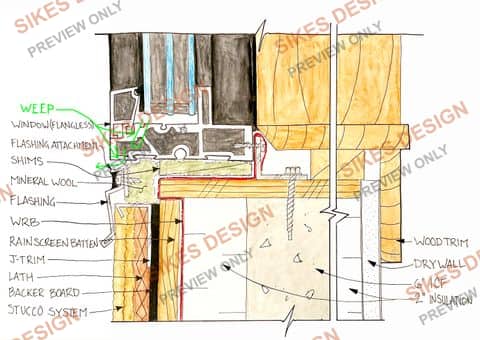
Flangeless Window Head/Sill at Stucco over ICF
Flangeless window head and sill at a stucco-clad ICF wall: mineral wool at the rough opening, flashing and weep path, WRB, rainscreen batten, lath and backer board, and the finish stucco system over 6" ICF with 2" continuous insulation.
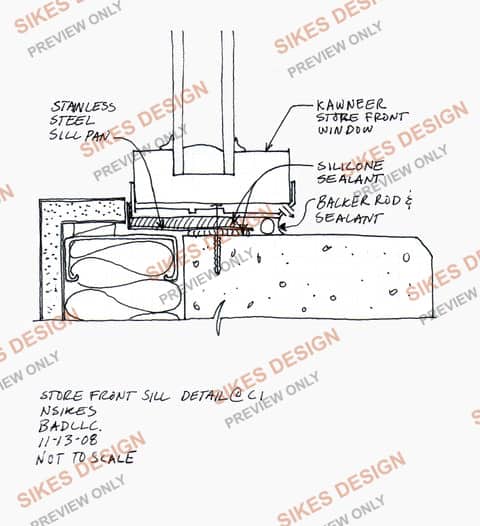
Storefront Sill Detail
Sill condition for a Kawneer aluminum storefront window: stainless steel sill pan, silicone sealant, and backer rod and sealant at the head of the pan into the wall below.
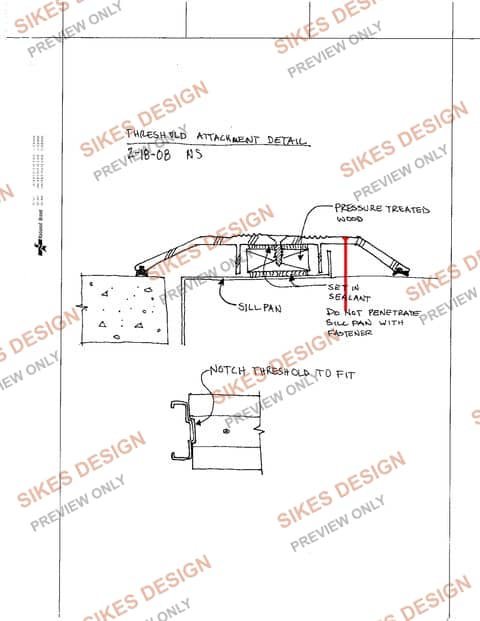
Threshold Attachment Detail
Door threshold set in sealant over a sill pan, with pressure-treated wood blocking and an explicit callout not to penetrate the sill pan with a fastener, plus a notch-to-fit detail for the threshold at the jamb.
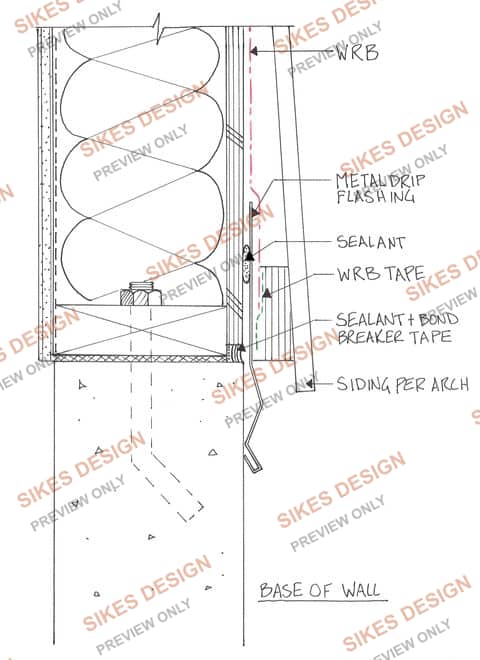
Base of Wall Flashing Detail
Base-of-wall condition where the WRB meets grade: metal drip flashing, sealant, WRB tape, and sealant with bond-breaker tape at the siding-to-foundation transition.
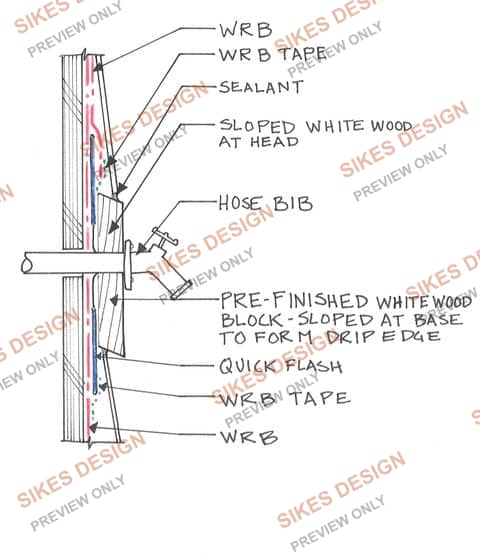
Hose Bib Penetration Detail
Hose bib penetration through a wood-framed wall: WRB and WRB tape, sealant, a sloped wood block at the head, and a pre-finished wood block sloped at the base to form a drip edge, with quick-flash at the penetration.
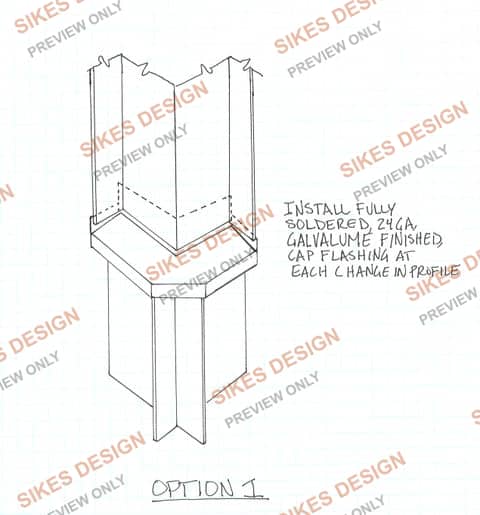
Outside Corner Cap Flashing Detail
Fully soldered 24-gauge Galvalume-finished cap flashing at an outside corner change in wall profile, detailed to shed water at the transition rather than relying on sealant alone.
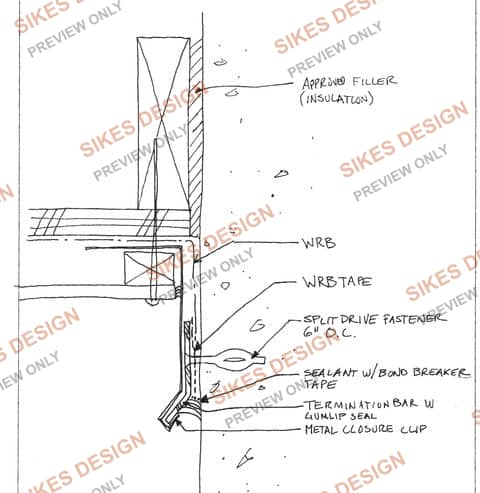
Concrete-to-Wood Transition Detail
Transition from a concrete wall to wood framing above: approved filler insulation, WRB and WRB tape, a split-drive fastener at 6 inches on center, sealant with bond-breaker tape, and a termination bar with gum-lip seal at a metal closure clip.
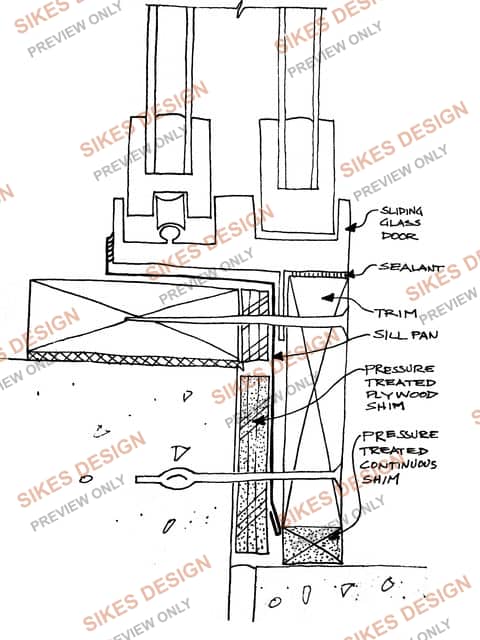
Sliding Glass Door Sill Detail
Sill condition at a sliding glass door: sealant and trim at the door frame, a sill pan carrying water out past the wall plane, and pressure-treated plywood and continuous shims setting the door level over the framed opening.
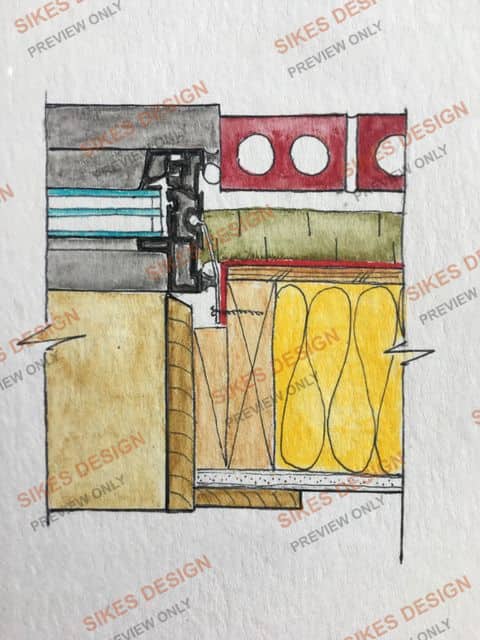
Window Jamb at Brick Veneer — Isometric
Isometric section through a window jamb in a brick veneer wall: window frame and glazing, continuous insulation, wood sheathing over stud framing, batt insulation, WRB, and the brick veneer wythe with its air space.
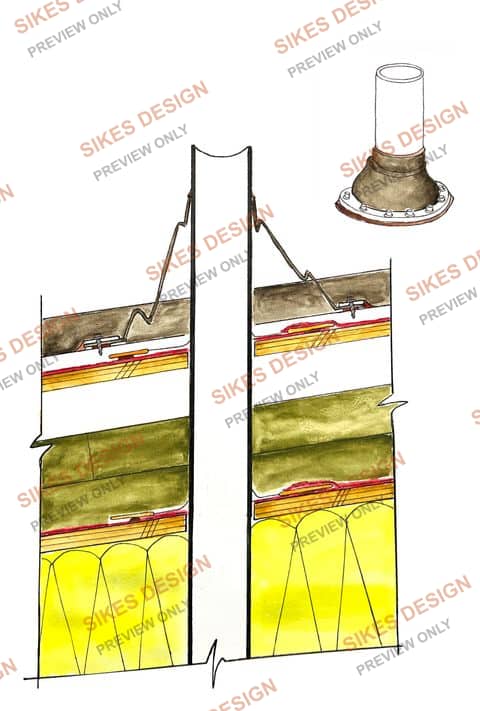
Vent Pipe Penetration at Flat Roof
Plumbing vent pipe penetration through a low-slope roof membrane: step and counter-flashing at the pipe curb over the roofing layers, paired with a mechanically-fastened rubber pipe boot at the penetration.
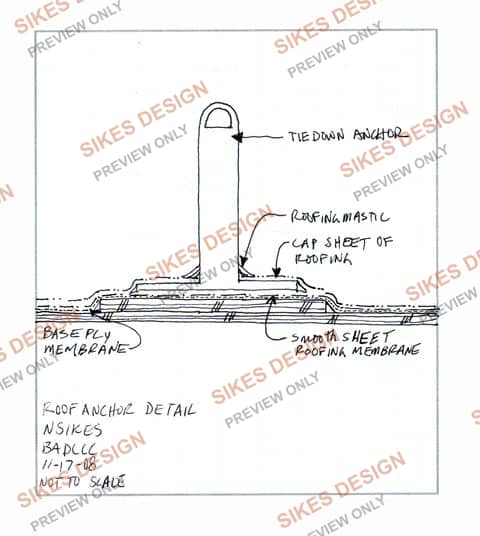
Roof Anchor / Tie-Down Detail
Fall-protection tie-down anchor penetrating a built-up roof membrane: base ply membrane, smooth sheet roofing membrane, a cap sheet with roofing mastic sealing the post, all built up around the anchor post.
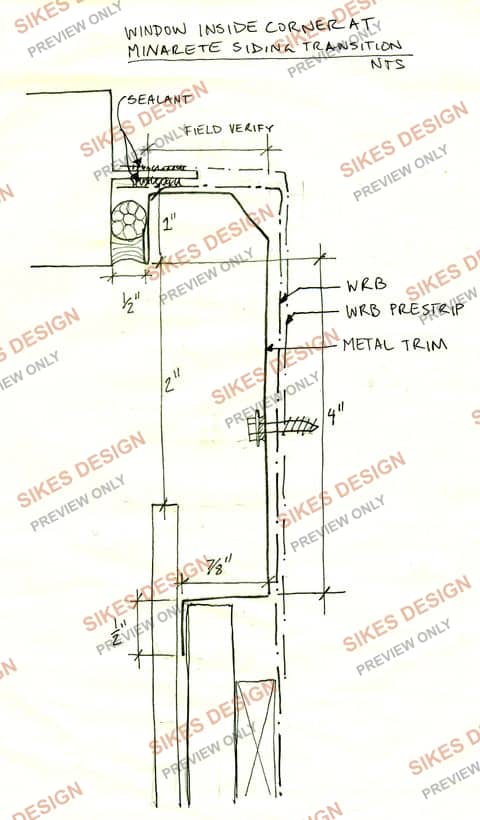
Window Inside Corner at Siding Transition
Inside corner condition where a window meets a change in siding material: WRB, WRB prestrip, metal trim, and sealant at the transition, with field-verify dimensions called out for the corner geometry.
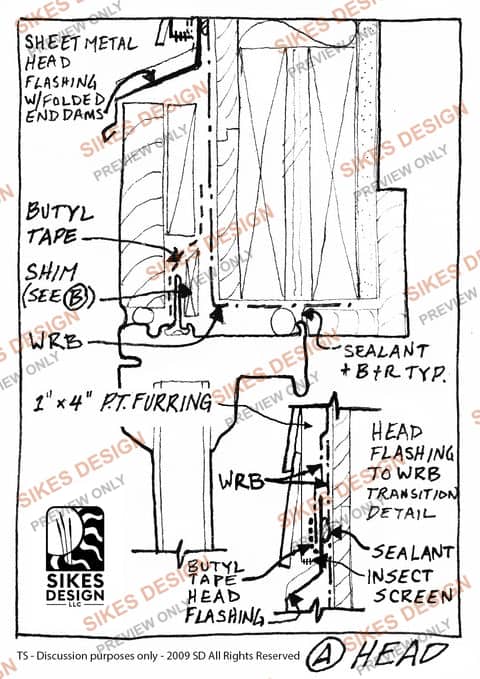
Window Head Flashing to WRB Transition
Sheet metal head flashing with folded end dams over a window, tying into the WRB through a shim and butyl-tape transition with an insect screen at the vent gap, over pressure-treated furring. Sikes Design, 2009.
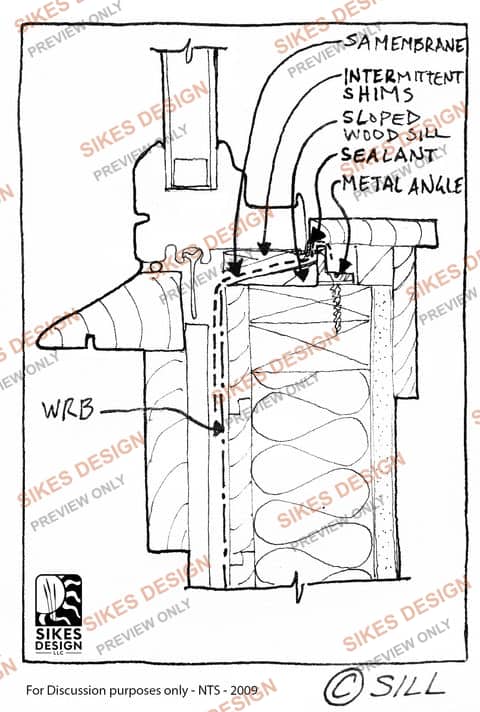
Window Sill — SA Membrane and Sloped Wood Sill
Window sill built from a sloped wood sill member, self-adhered membrane, intermittent shims, sealant, and a metal angle carrying water out past the WRB. Sikes Design, 2009.
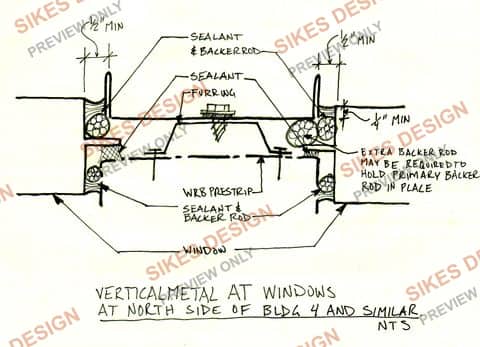
Vertical Metal Joint at Windows
Vertical metal joint between adjacent window openings: sealant and backer rod at minimum 1/2-inch and 1/4-inch joint widths, furring behind the joint, and WRB pre-strip carried behind the metal, with a note on adding extra backer rod to hold the primary bead in place.
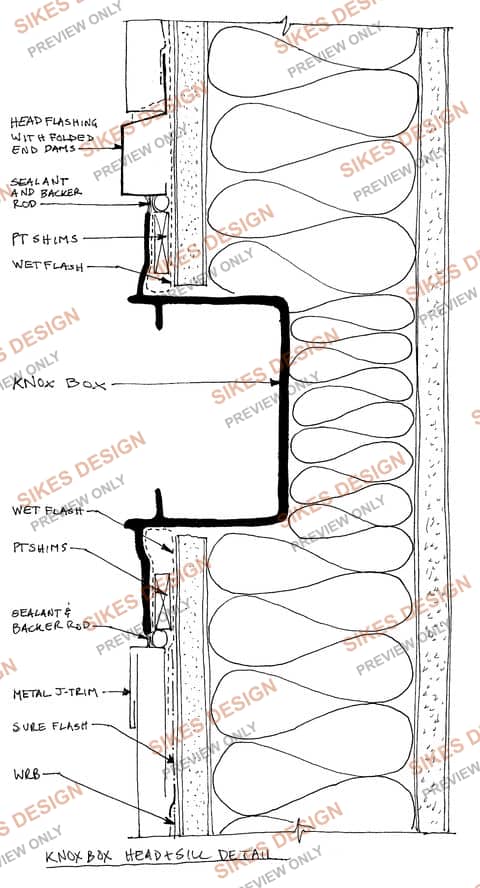
Knox Box Head + Sill Detail
Head and sill flashing for a Knox box penetration through a wall: head flashing with folded end dams, PT shims, wet flash, sealant and backer rod, a metal J-trim, and sure-flash tying into the WRB at the sill.
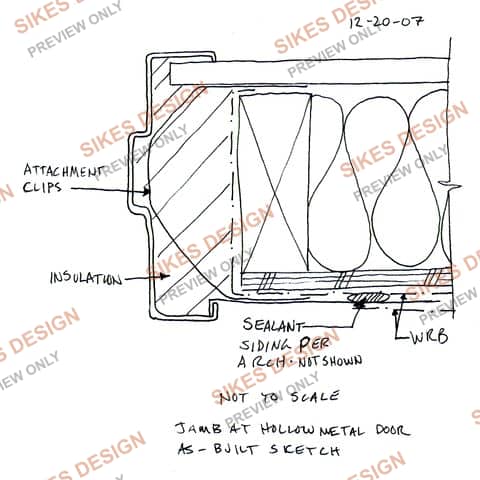
Jamb at Hollow Metal Door — As-Built
As-built jamb condition at a hollow metal door: attachment clips into the frame, insulation in the cavity, WRB carried behind the jamb, and sealant at the siding-to-frame joint.
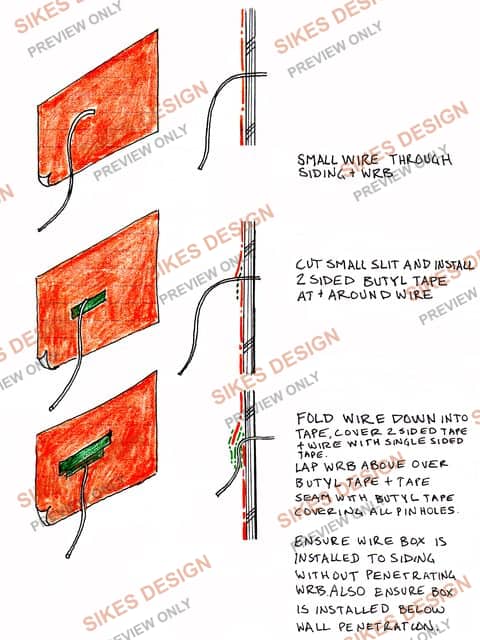
Doorbell Wire Penetration Detail — Step-by-Step
Three-step sequence for a small wire penetration through siding and WRB without compromising the air/water barrier: cut a small slit and install two-sided butyl tape around the wire, fold the wire down into the tape, then cover with single-sided tape and lap the WRB above over the seam -- with the wire box mounted below the penetration so it cannot collect water.
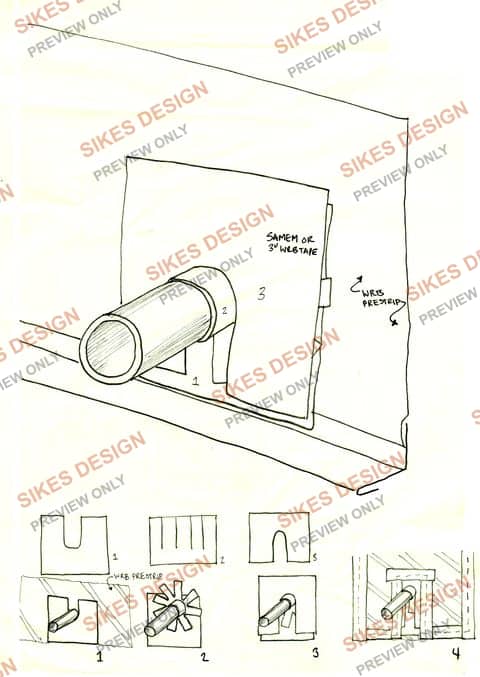
Peel-and-Stick Pipe Penetration Detail — Step-by-Step
Four-step sequence for flashing a pipe penetration with peel-and-stick membrane when a pre-fabricated quick-flash boot will not fit: cut a cross-slit pattern in the self-adhered membrane or 3-inch WRB tape, dome it down over the pipe, then lap the WRB pre-strip over the top and integrate it into the surrounding wall assembly.
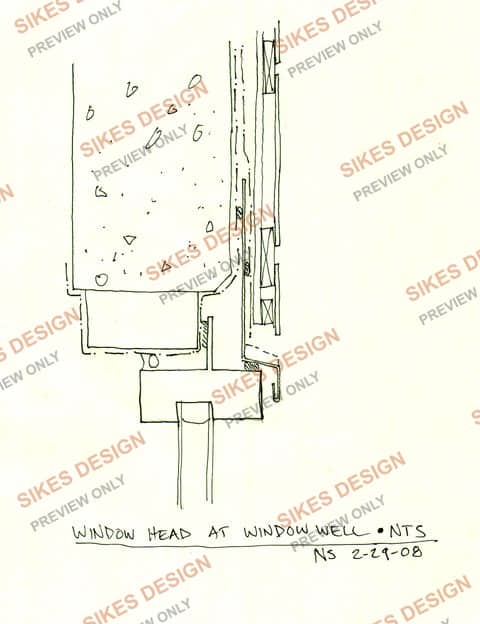
Window Head at Window Well
Head condition for a window set in a below-grade window well, sequencing the head flashing and WRB around the well opening.
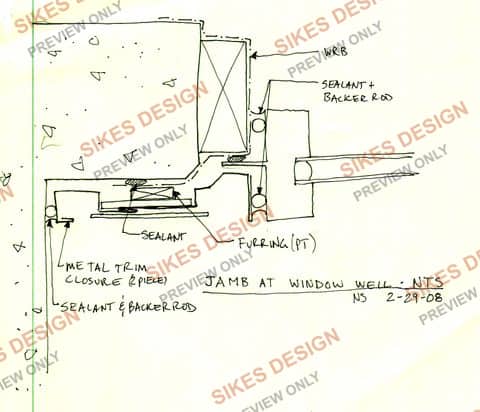
Jamb at Window Well
Jamb condition at a window well: WRB, sealant and backer rod, a two-piece metal trim closure, and PT furring tying the window frame into the well opening.
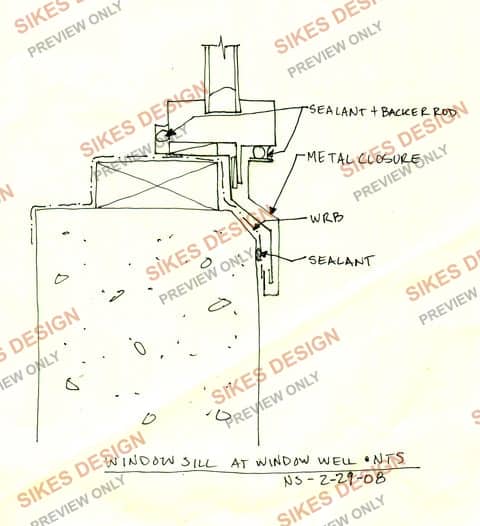
Sill at Window Well
Sill condition at a window well: sealant and backer rod at the frame, a metal closure piece, WRB, and sealant carrying water away from the sill into the well.
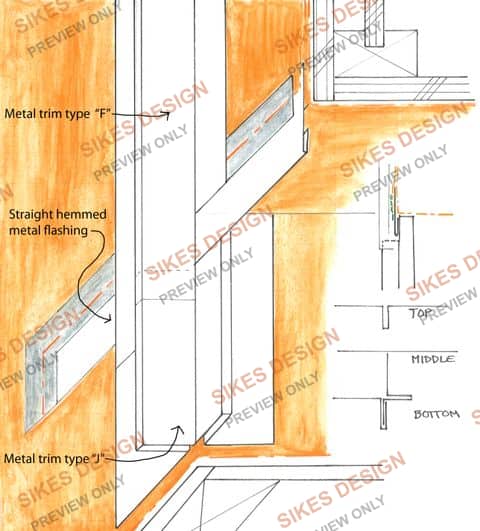
Outside Corner Metal Trim Detail
Outside corner condition using two metal trim profiles: a straight hemmed metal flashing trim type 'F' and a trim type 'J' at the corner return, shown with top/middle/bottom profile options for the corner break.
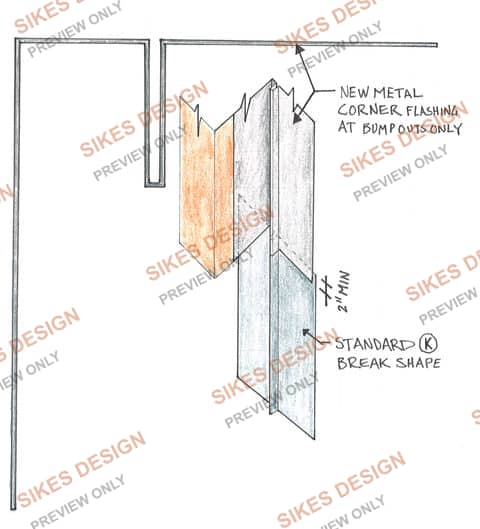
New Metal Corner Flashing at Bumpouts
New metal corner flashing detail for wall bumpouts only, using a standard K break shape with a 2-inch minimum leg and mitered corner folds.
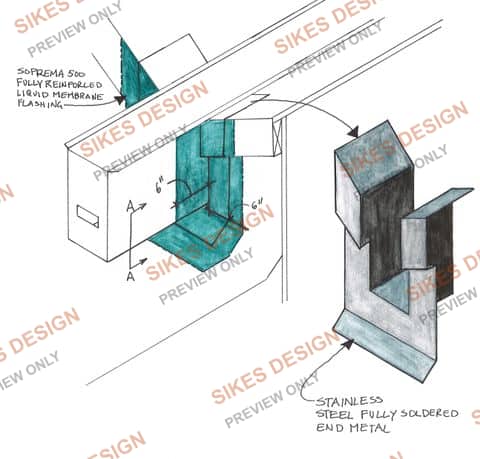
Gutter / Drain End Detail — Liquid Membrane and Soldered End Metal
Gutter or drain end condition combining a fully reinforced liquid membrane flashing at the roof-to-gutter transition with a stainless steel, fully soldered end metal piece at the drain outlet.
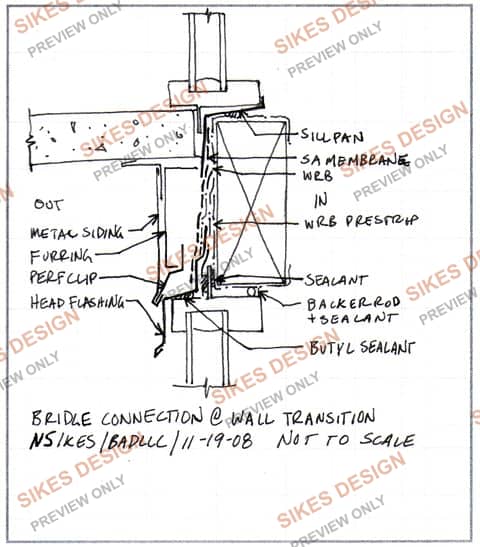
Bridle Connection at Wall Transition
Bridle connection where two wall planes meet at a window sill: a sill pan, self-adhered membrane, WRB and WRB pre-strip, sealant and backer rod, butyl sealant, and metal siding on furring with a perforated clip and head flashing tying the two sides together.
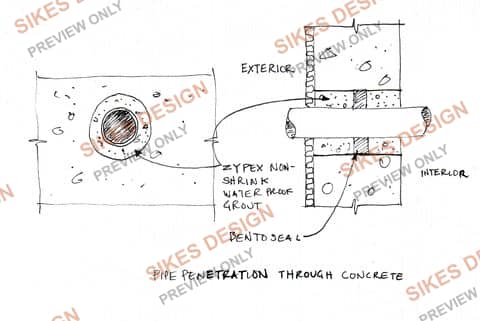
Pipe Penetration Through Concrete
Pipe penetration through a concrete wall or slab: non-shrink waterproof grout packed around the pipe at the penetration, with a bentonite-based sealant at the interior face.
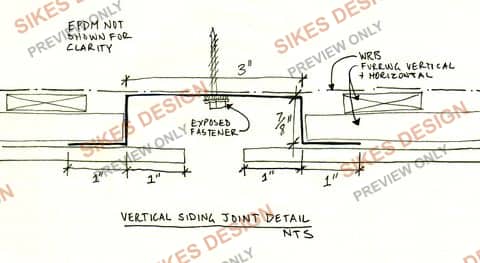
Vertical Siding Joint Detail
Vertical joint between metal siding panels: 1-inch reveals on either side of a 7/8-inch gap, an exposed fastener at the panel edge, and WRB furring running both vertical and horizontal behind the siding.
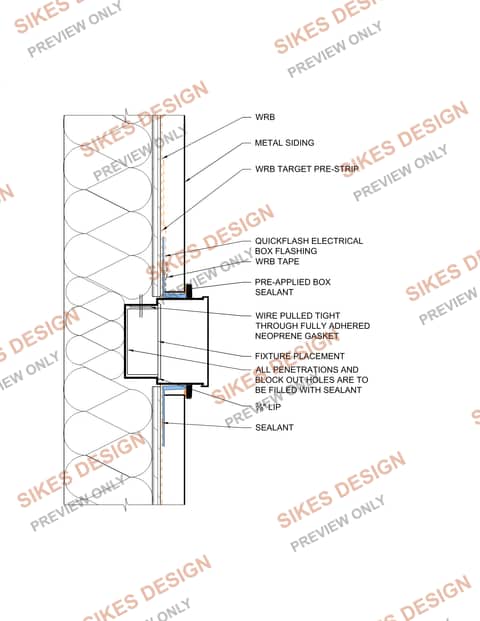
Electrical Box Detail — Metal Siding
Electrical box penetration through a metal-sided wall: WRB with a target pre-strip and WRB tape, quickflash box flashing with a pre-applied box sealant, a 3/8-inch lip, and a note to seal every penetration and blockout hole, plus the fully adhered neoprene gasket the wire is pulled tight through.
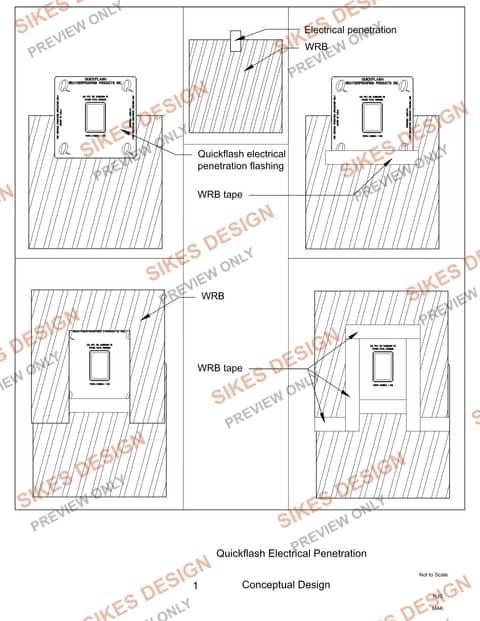
Quickflash Electrical Penetration — Conceptual Design
Conceptual four-step layout for a quickflash electrical penetration flashing product: the flashing plate itself, WRB tape applied at the penetration, and two sequencing views showing how the WRB and tape integrate around the fixture.
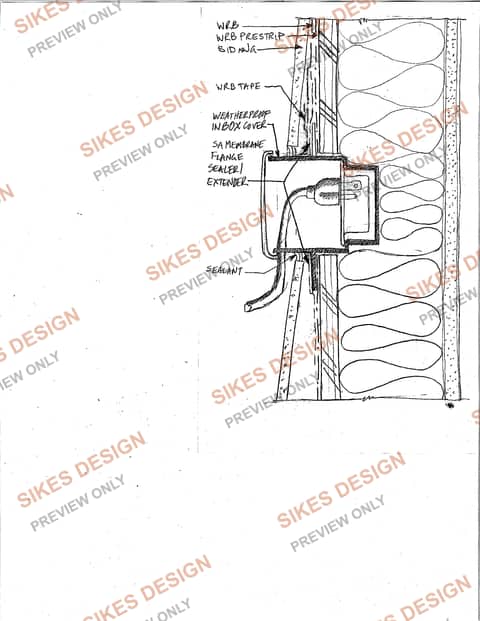
Outside Electrical Outlet Detail
Exterior electrical outlet penetration: WRB, WRB pre-strip, and siding integrated with WRB tape, a weatherproof in-box cover, a self-adhered membrane flange sealer/extender, and sealant at the box perimeter.
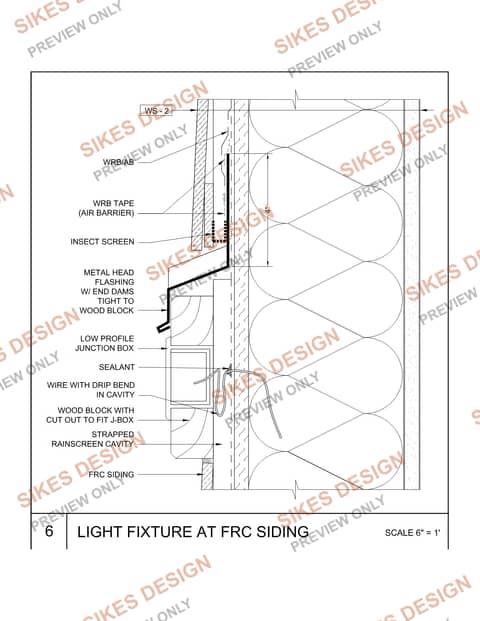
Light Fixture at FRC Siding
Exterior light fixture penetration through fiber-cement siding: WRB/AB with WRB tape as the air barrier, an insect screen at the vent gap, metal head flashing with end dams tight to a wood block, a low-profile junction box, a wood block cut out to fit the J-box, and a strapped rainscreen cavity behind the FRC siding.
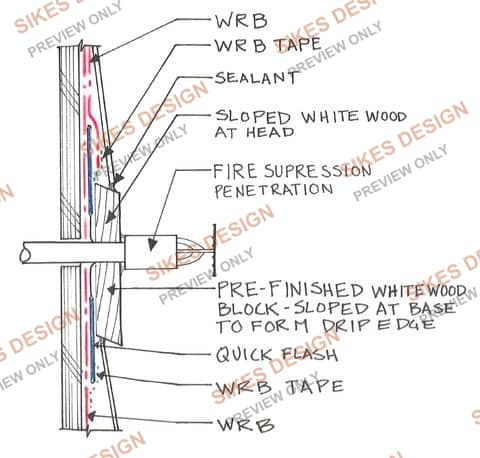
Fire Suppression Penetration Detail
Fire suppression line penetration through a wood-framed wall: WRB and WRB tape, sealant, a sloped wood block at the head, and a pre-finished wood block sloped at the base to form a drip edge, with quick-flash at the penetration.
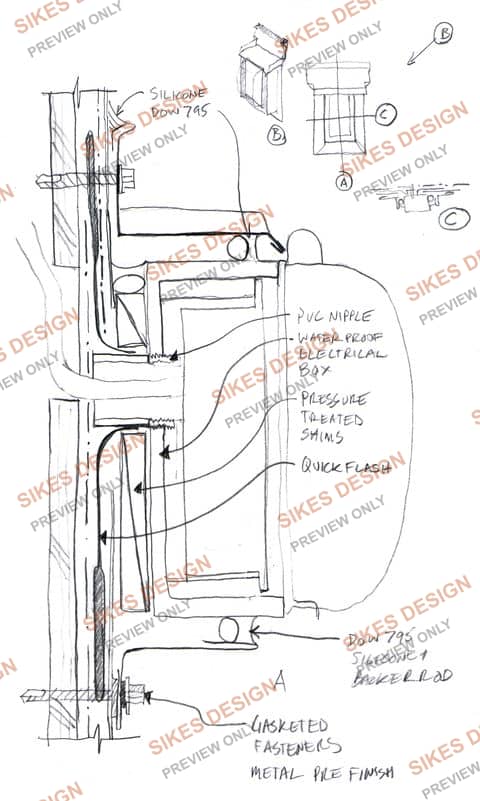
Electrical Box Detail — PVC Nipple + Waterproof Box
Waterproof electrical box penetration using a PVC nipple, pressure-treated shims, quickflash flashing, and Dow 795 silicone with backer rod at the box perimeter, finished with gasketed fasteners and a matching metal plate.
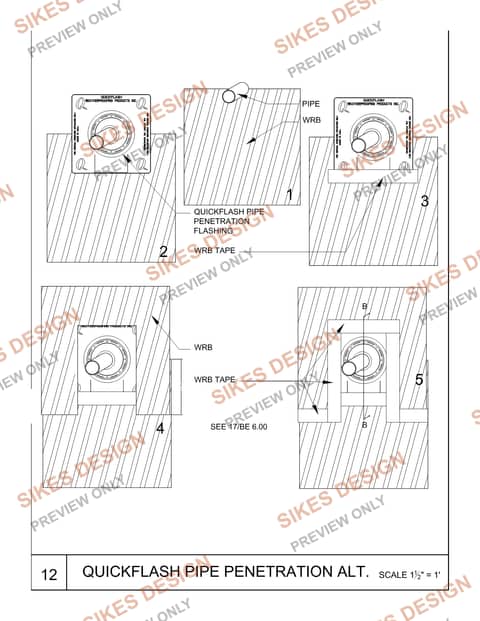
Quickflash Pipe Penetration — Alternate
Alternate sequencing for a quickflash pipe penetration flashing: the flashing plate over the pipe, WRB and WRB tape layered around it, and a companion elevation view keyed to a matching wall section for reference.
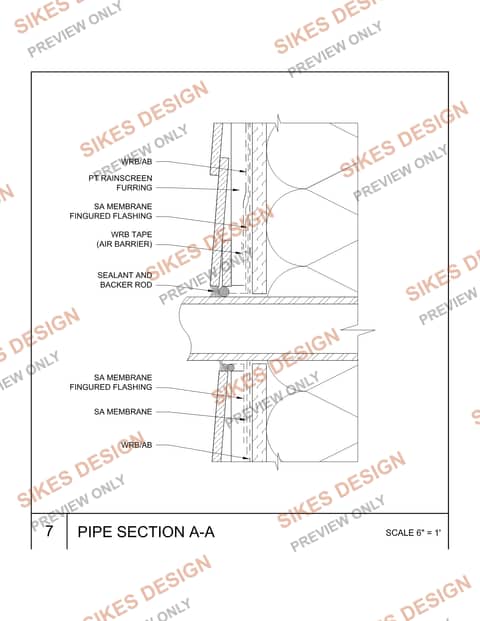
Pipe Penetration — Fingered SA Membrane Flashing
Pipe penetration section showing a self-adhered membrane with fingered flashing at the penetration, tied into WRB/AB, PT rainscreen furring, and sealant with backer rod at the wall face.
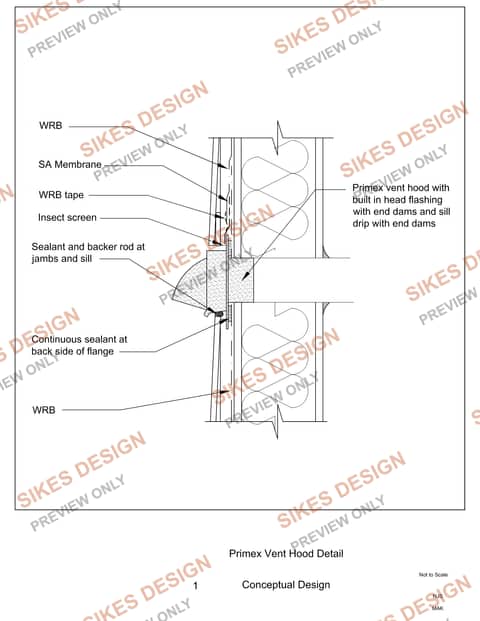
Primex Vent Hood Detail — Conceptual Design
Vent hood penetration with a built-in head flashing (with end dams) and sill drip (with end dams): WRB, SA membrane, WRB tape, insect screen, sealant and backer rod at the jambs and sill, and continuous sealant at the back side of the flange.
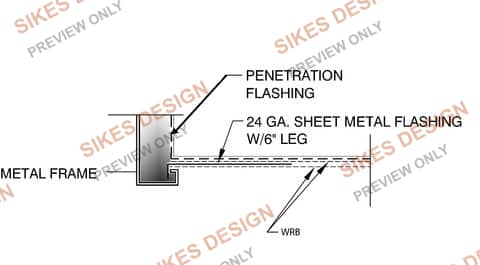
Penetration Flashing at Metal Door Frame
Penetration flashing detail at a metal door/window frame: 24-gauge sheet metal flashing with a 6-inch leg lapped over the WRB at the metal frame.
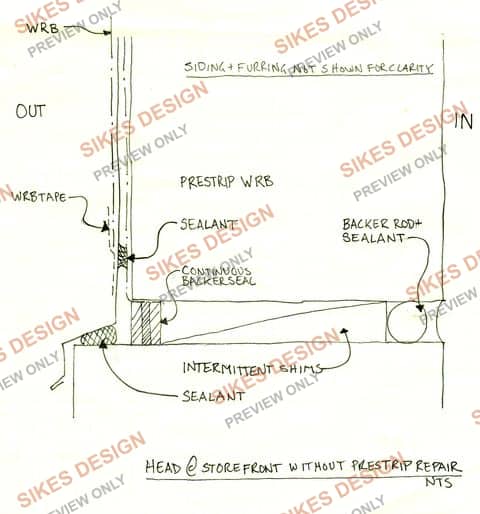
Head at Storefront Without Prestrip — Repair Detail
Storefront head condition where the WRB was not pre-stripped: WRB and WRB tape, sealant, a continuous backer seal, and intermittent shims, with backer rod and sealant finishing the interior joint -- a repair sequence for a missed prestrip.
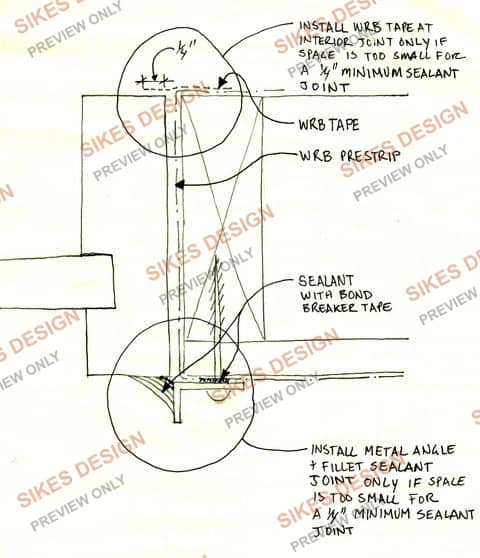
Jamb at Storefront — WRB Tape and Sealant Options
Storefront jamb condition showing two options depending on available space: WRB tape at the interior joint (or a 1/4-inch minimum sealant joint), WRB prestrip, and sealant with bond-breaker tape, with a metal angle and fillet sealant joint as the fallback when there is not room for a full sealant joint.
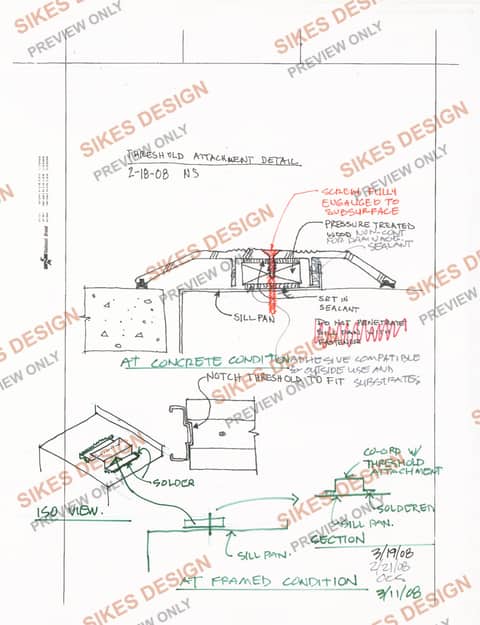
Threshold Attachment — Concrete & Framed Conditions
Threshold attachment sequence covering both a concrete substrate condition and a framed substrate condition: a screw fully engaged to the subsurface, pressure-treated wood set in sealant without penetrating the sill pan, and a soldered sill pan detail with a notch-to-fit threshold.
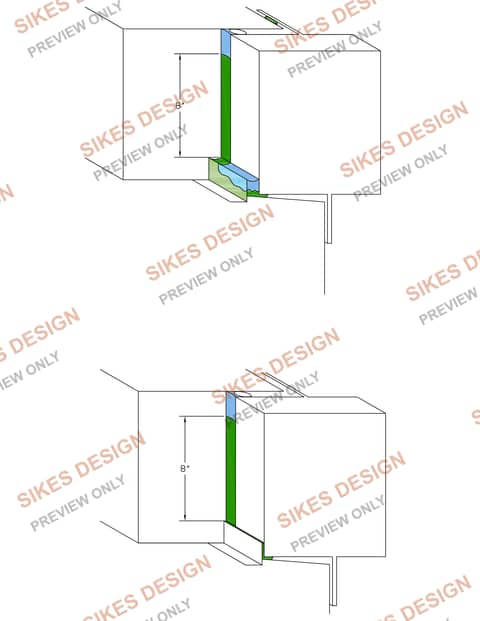
Window Corner Sealant Detail
Sealant zone at a window corner shown in two configurations, each with an 8-inch sealant return up the jamb tying into the sill sealant below.
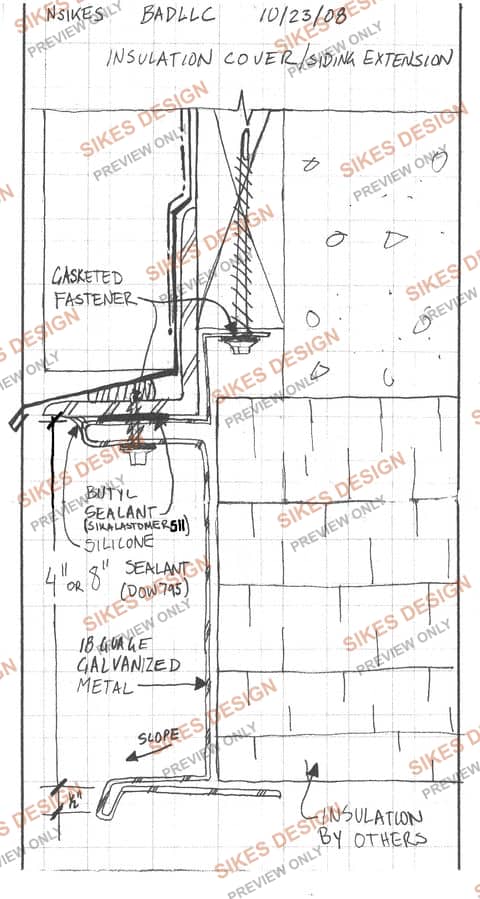
Insulation Cover / Siding Extension Detail
Retrofit detail for extending an insulation cover past existing siding: gasketed fasteners, butyl and silicone sealants, and 18-gauge galvanized metal flashing sloped to shed water over the added insulation.
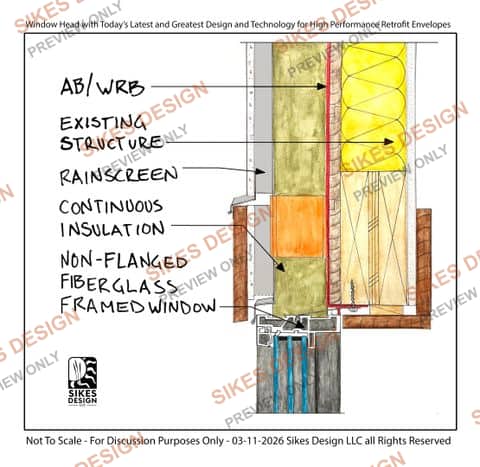
Window Head — High-Performance Retrofit (2026)
Window head condition for retrofitting an existing wall to a high-performance rainscreen assembly: AB/WRB over the existing structure, continuous insulation with a rainscreen cavity, and a non-flanged fiberglass-framed window set into the new assembly. Sikes Design LLC, 2026.
Window Sill — High-Performance Retrofit (2026)
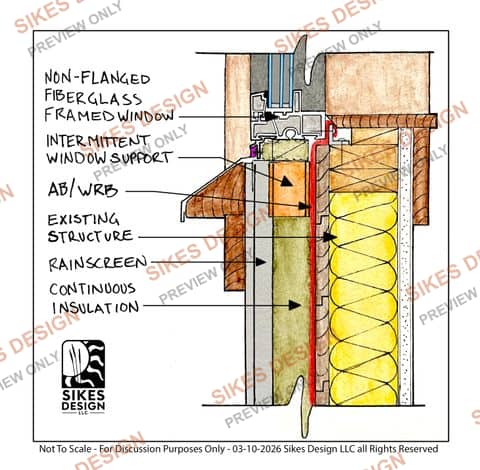
Sill condition for the same high-performance retrofit assembly: a non-flanged fiberglass-framed window on intermittent window support, AB/WRB tied to the existing structure, and continuous insulation behind a rainscreen cavity. Sikes Design LLC, 2026.
Window Replacement Sill — Existing Masonry Reuse
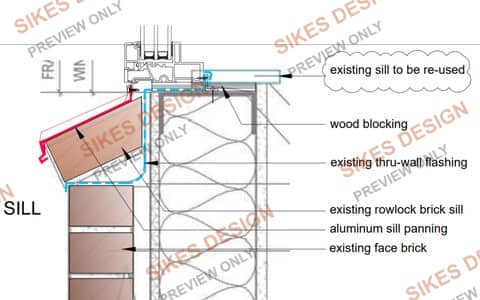
Retrofit window sill for a replacement window in an existing masonry wall: reuses the existing rowlock brick sill and thru-wall flashing, with new wood blocking and aluminum sill panning integrating the replacement window into the existing construction.
Eave / Rake Retrofit Detail — New Fascia & Soffit
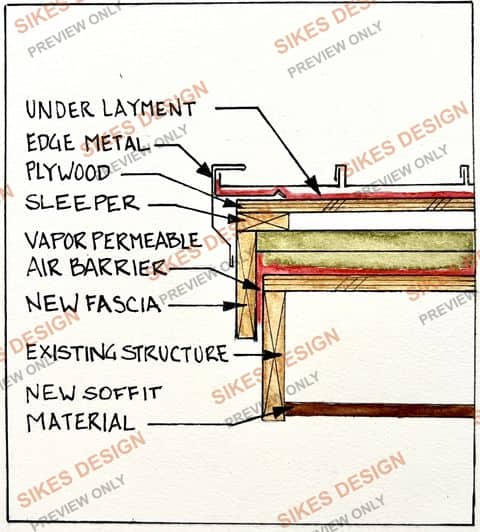
Retrofit eave and rake condition adding new fascia and soffit over an existing structure: underlayment and edge metal at the roof edge, plywood and a sleeper furring out the new fascia, a vapor-permeable air barrier wrapping the assembly, and new soffit material closing out the underside.